(Removed Angel story Writer) |
m (removed uncredited and fixed Johnson appearance) |
||
| Line 12: | Line 12: | ||
| Penciler1_1 = Carl Burgos |
| Penciler1_1 = Carl Burgos |
||
| Inker1_1 = Carl Burgos |
| Inker1_1 = Carl Burgos |
||
| − | | Colourist1_1 = |
+ | | Colourist1_1 = |
| − | | Letterer1_1 = |
+ | | Letterer1_1 = |
| Editor1_1 = Joe Simon |
| Editor1_1 = Joe Simon |
||
| Line 19: | Line 19: | ||
| Penciler2_1 = Paul Gustavson |
| Penciler2_1 = Paul Gustavson |
||
| Inker2_1 = Paul Gustavson |
| Inker2_1 = Paul Gustavson |
||
| − | | Colourist2_1 = |
+ | | Colourist2_1 = |
| − | | Letterer2_1 = |
+ | | Letterer2_1 = |
| Editor2_1 = Joe Simon |
| Editor2_1 = Joe Simon |
||
| Line 26: | Line 26: | ||
| Penciler3_1 = Bill Everett |
| Penciler3_1 = Bill Everett |
||
| Inker3_1 = Bill Everett |
| Inker3_1 = Bill Everett |
||
| − | | Colourist3_1 = |
+ | | Colourist3_1 = |
| Letterer3_1 = Bill Everett |
| Letterer3_1 = Bill Everett |
||
| Editor3_1 = Joe Simon |
| Editor3_1 = Joe Simon |
||
| Line 33: | Line 33: | ||
| Penciler4_1 = Al Anders |
| Penciler4_1 = Al Anders |
||
| Inker4_1 = Al Anders |
| Inker4_1 = Al Anders |
||
| − | | Colourist4_1 = |
+ | | Colourist4_1 = |
| − | | Letterer4_1 = |
+ | | Letterer4_1 = |
| Editor4_1 = Joe Simon |
| Editor4_1 = Joe Simon |
||
| Line 40: | Line 40: | ||
| Penciler5_1 = Harry Ramsay |
| Penciler5_1 = Harry Ramsay |
||
| Inker5_1 = Harry Ramsay |
| Inker5_1 = Harry Ramsay |
||
| − | | Colourist5_1 = |
+ | | Colourist5_1 = |
| − | | Letterer5_1 = |
+ | | Letterer5_1 = |
| Editor5_1 = Joe Simon |
| Editor5_1 = Joe Simon |
||
| Line 47: | Line 47: | ||
| Penciler6_1 = Steve Dahlman |
| Penciler6_1 = Steve Dahlman |
||
| Inker6_1 = Steve Dahlman |
| Inker6_1 = Steve Dahlman |
||
| − | | Colourist6_1 = |
+ | | Colourist6_1 = |
| − | | Letterer6_1 = |
+ | | Letterer6_1 = |
| Editor6_1 = Joe Simon |
| Editor6_1 = Joe Simon |
||
| Line 54: | Line 54: | ||
| Penciler7_1 = Irwin Hasen |
| Penciler7_1 = Irwin Hasen |
||
| Inker7_1 = Irwin Hasen |
| Inker7_1 = Irwin Hasen |
||
| − | | Colourist7_1 = |
+ | | Colourist7_1 = |
| − | | Letterer7_1 = |
+ | | Letterer7_1 = |
| Editor7_1 = Joe Simon |
| Editor7_1 = Joe Simon |
||
| Line 61: | Line 61: | ||
| Penciler8_1 = Ben Thompson |
| Penciler8_1 = Ben Thompson |
||
| Inker8_1 = Ben Thompson |
| Inker8_1 = Ben Thompson |
||
| − | | Colourist8_1 = |
+ | | Colourist8_1 = |
| − | | Letterer8_1 = |
+ | | Letterer8_1 = |
| Editor8_1 = Joe Simon |
| Editor8_1 = Joe Simon |
||
| Line 134: | Line 134: | ||
'''Supporting Characters:''' |
'''Supporting Characters:''' |
||
| − | * {{apn|[[Johnson |
+ | * {{apn|[[Pete Johnson (Earth-616)|Johnson]]|Marvel Mystery Comics #2|Marvel Mystery Comics #5}} |
* {{only|[[Maizie (Earth-616)|Maizie]]}} |
* {{only|[[Maizie (Earth-616)|Maizie]]}} |
||
Revision as of 14:05, 16 July 2014
 | ||
Appearing in "New York Hit by Green Flame"
Featured Characters:
Supporting Characters:
Villains:
- Dr. Manyac
 (First appearance)
 - Green Flames
Other Characters:
- Clancy, Inspector Reiss, and other policemen
- Unnamed tenant
Locations:
- New York
- New York City
- Broadway
- Broadway
- New York City
Synopsis for "New York Hit by Green Flame"
After reports of a strange army of "Green Flames" attacking New York, The Human Torch is called into the city by his friend Johnson to face a new threat. Asked to take on an alias, the Torch decides on Jim Hammond. Arriving on Broadway, he is stopped by the police who tell him the city (which is in ruins) is under marital law and demand to know his identity. Suddenly, a Green Flame arrives and begins wrecking the city. The Torch flames on and battles the foe, realizing his flame is freezing cold. Pouring on the heat, the Torch kills the Green Flame before he can give any information. Thinking the Torch had killed the Green Flame, the police attempt to arrest him, however the Torch manages to escape.
Meeting up with Johnson and his colleague Maizie, the Torch learns that the chaos has been caused by Dr. Menacye. Menacye is threatening to destroy New York City, starting with the slums and later trendy 5th Avenue if his demands of ransom are not met. When the city refuses to comply, he sends an army of Green Flames to take out the slums of New York. The Torch goes into action, and when Menacye (spotting Maizie watching) takes Maizie hostage, the Torch frees her and easily defeats Menacye, turning him over to the authorities. When Inspector Clancy tries to arrest him for the murder of "Jim Hammond", the Torch flames off and reveals that both are the same man.
Appearing in "Butch the Giant"
Featured Characters:
Villains:
- Brink
- "Butch" (Only appearance; dies)[1]
- Rickie - (Death)
- Weasel - (Death)
Other Characters:
- Unnamed New Yorkers and policemen
Locations:
- New York
- New York City
- Devil's Playground
- Devil's Playground
- New York City
Synopsis for "Butch the Giant"
The Devil's Playground: Location of some of the worst mobsters in the city. A small time mobster named Brinke usurps control of his former bosses mob with the help of his giant, the Brute. He soon sends the Brute out to do his bidding causing chaos and murder across the city and stealing millions in loot. When the police attempt to stop the Brute, they find that nothing they throw at him can harm the creature.
Learning of the trouble, the Angel swings into action and confronts the creature, who quickly becomes frightened by the Angel's superior fighting skills and flees. The Angel follows the creature with the police not far behind and they end up at Brinke's hideout. While Brink and his men attempt to flee the scene, the Angel fights the creature to the death, smashing it through a wall to fall to it's death in the street below. After the creatures death, Brinke and his men are easily captured.
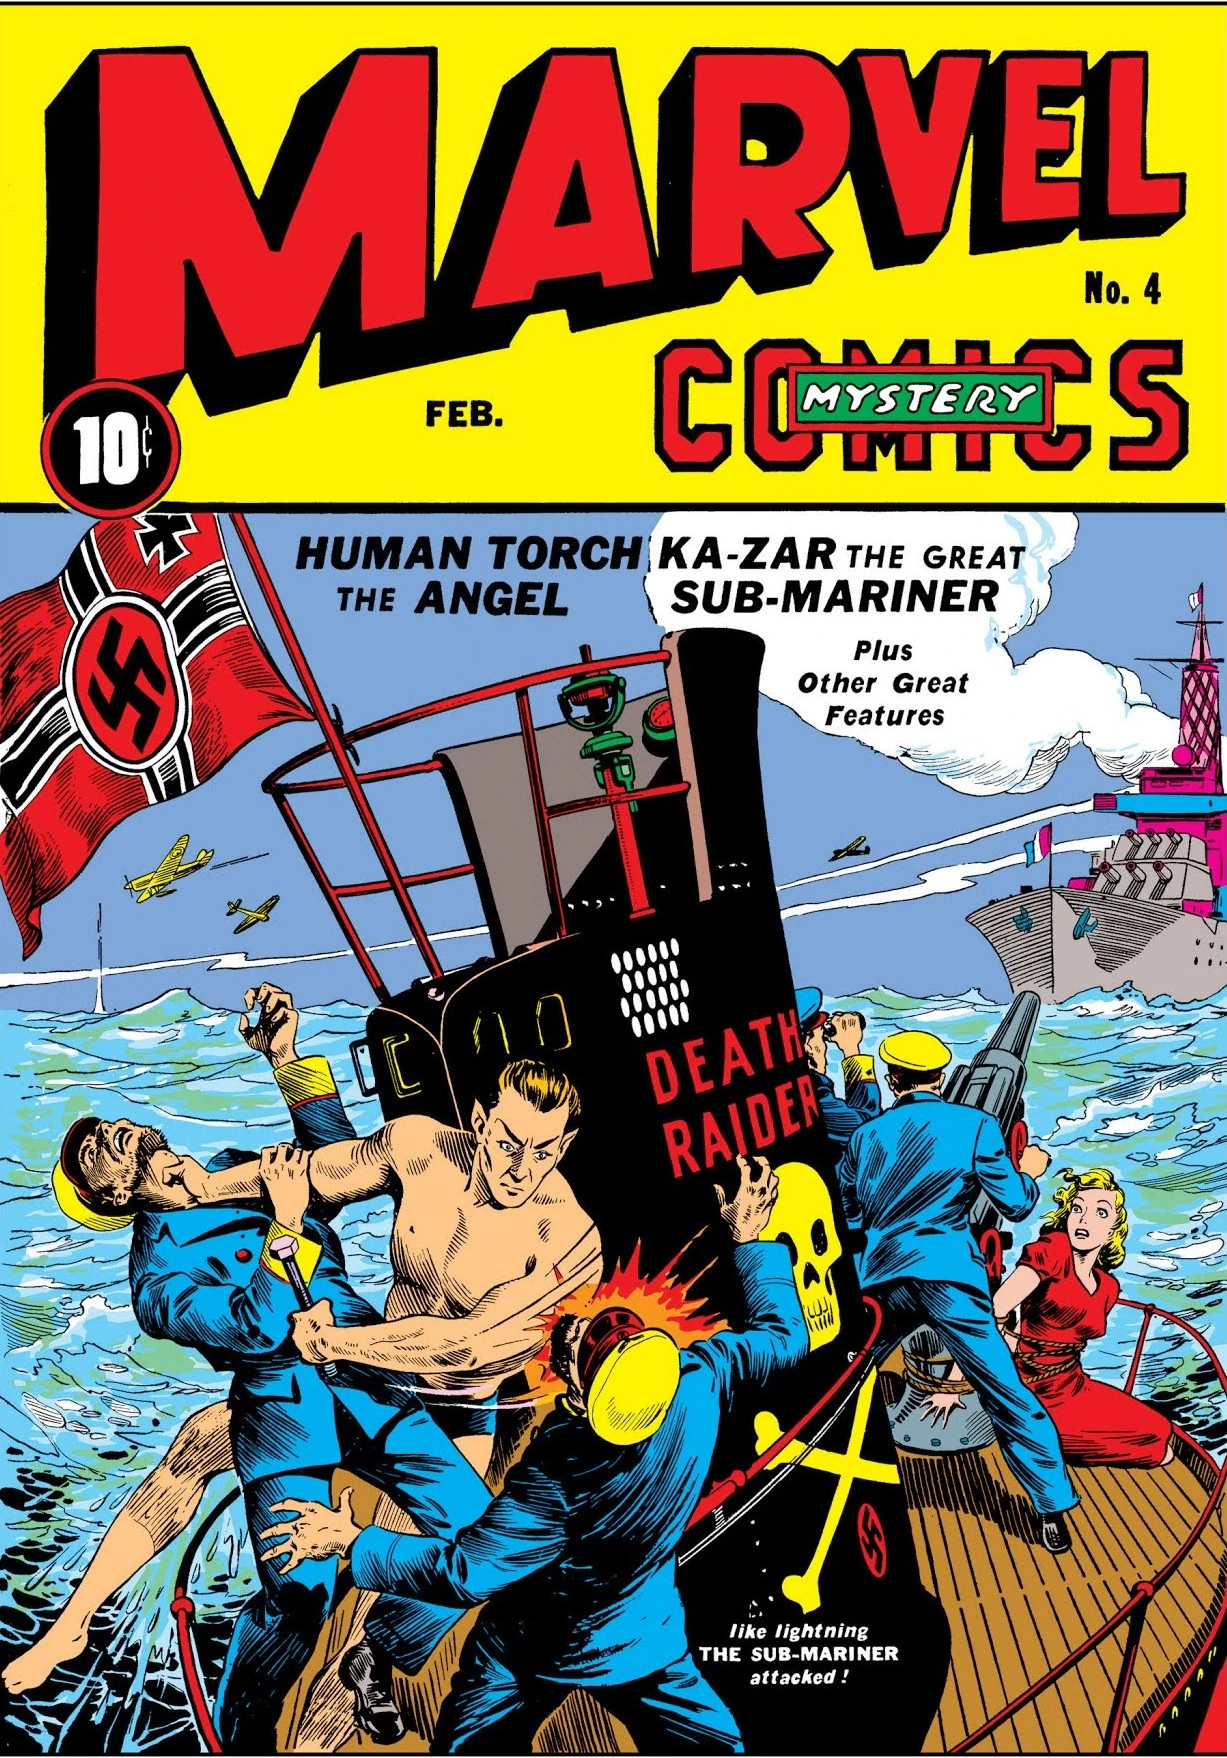
Appearing in "The Sub-Mariner Goes To War"
Featured Characters:
Supporting Characters:
Villains:
- Several Nazis
Other Characters:
- Petrod, Daka, Naka and other Atlanteans
Locations:
- Atlantic Ocean
- Antarctica
- Atlantean Ice Castle
- North Sea
Vehicles:
- German carrier & U-boat
- British freighter
- Atlantean "aerial-submarines"
Synopsis for "The Sub-Mariner Goes To War"
Continued from last issue...
Betty Dean convinces the Sub-Mariner to help the Allies stop Nazi raids on supply planes and ships, and leaves her on the island to be recovered by the Navy. Returning to Atlantis, Namor convinces the Holy One to allow him to use the warships of Atlantis to stop the war. As Namor rushes off to find conflict, he vows to stop the war but not choosing sides, just stopping conflicts caused by the power mad governments forcing it's people to war.
He comes across an Allied cargo plane being shot out of the sky. Namor orders his fleet of sky subs to shoot the Nazi fighters out of the sky and then keeps the cargo plane afloat while the crew and cargo can be loaded into one of the Atlantean vessels to be taken to their destination in Norway. Checking how many aboard are dead, Namor comes across a newspaper reporting how an American ship is being held by the Nazi's under suspicion of carrying contraband.
The Sub-Mariner rushes out to investigate the situation alone and sneaks aboard the ship, where he convinces the crew to secretly jump ship and take over one of the German U-Boats and use it to sink the other vessel guarding their ship. Their plot is a success, thanks to the help of Namor. When the captain fears they cannot make it out of the area without hitting sea mines, Namor has his Atlantean comrades submerge the mines to eliminate their threats and dives into the water to help lead the ship to safety.
This story is continued next issue...
Appearing in "The Claim Jumpers"
Featured Characters:
Supporting Characters:
- Zeb
- Luke
- Lightning
- Manuel
Villains:
- Buck and his cohorts
Other Characters:
- Ben
Synopsis for "The Claim Jumpers"
When gold prospectors Zeb and Luke find gold, Luke sends Zeb into town to stake their claim and warns him against telling anyone about it. However, when Zeb stops for water he tells his friend Manuel about their find. It is overheard by a pair of thugs who decide to follow him into town and try and trick Zeb out of his claim.
When Zeb files his claim he is confronted by the men who convince him to go to the saloon for a drink, but instead attempt to rob him of his claim paperwork. When he refuses to give it up, they club him in the back of the head with the butt of a gun and ride off to kill Luke.
Zeb is found by the Masked Raider who revives the man and promises to help him get his claim back and protect Luke. They arrive just in time, as Luke has been out gunned and is ordered to surrender. The Masked Raider makes short work of the thugs however when Zeb and Luke offer the Masked Raider a partnership in their gold operation, the hero has already departed.
Appearing in "Warning Enough"
Featured Characters:
- Steve Naylor
Supporting Characters:
- Jim Stinson
- Chief Simcox
Villains:
- "Slip" Rodney
Locations:
- Anniston
Synopsis for "Warning Enough"
Steve Naylor is driving down the road when he reaches a hitchhiker. He picks him up and the hitchhiker turns out to be a escaped convict. He is forced to the crook to the railroad tracks outside of town in order to flee the state. However, his uncharacteristic behavior alerts one of his friends to call the police who deduce the situation and come to his rescue. While the crook manages to flee, the authorities will be waiting for him when he gets off the train.
Appearing in "Electro: The Marvel of the Age"
Featured Characters:
- Electro (First appearance)
Supporting Characters:
- Prof. Philo Zog (First appearance)
- Dick Gardner (Single appearance)[1]
Villains:
- Hymie Pazetto
Other Characters:
- Unnamed men
- Mike, Toby and other gangsters
- Joyce Lovely
- Mrs. Lovely
Locations:
- New York
- New York City
- Chinatown
- Chinatown
- New York City
Synopsis for "Electro: The Marvel of the Age"
Professor Zog creates a robot that he dubs Electro a crime fighting robot that he hopes will be his greatest contribution to mankind. With a successful test, he sets up an operation in which he hires a dozen law abiding men to be his field agents. Equipping them with portable telephones, he sends them out to investigate crimes and -- if need be, contact him to send Electro to help.
Agent number 3, Dick Gardner, finds a lead on the recent kidnapping of child actor Joyce Lovely and gets the drop of a crook and forces him reveal the girl was kidnapped by the Hymie Pazetto gang. He is taken to their hide out at the abandoned Pink Slipper Roadhouse where he gets the drop on the crooks and makes an escape attempt with the girl. As he drives away, Dick is shot and crashes. Captured, Gardner is thrown in a cellar along with Joyce.
Far from defeated, Dick calls Professor Zog who sends in Electro, who easily defeats the criminals and rescued both Dick and Joyce.
Appearing in "Ferret: Mystery Detective"
Featured Characters:
- Ferret (First appearance)
Supporting Characters:
- Prosser
- Lynne Froehm
Villains:
- Prima
- Knuckles Johnson
- Doc Wagner
Other Characters:
- Unnamed New Yorkers
Locations:
Synopsis for "Ferret: Mystery Detective"
One day while at home, the Ferret is interrupted when a man who was earlier reported as shot on the radio arrives at his door and collapses dead. Taking the body to police headquarters, he and the police find a match book for the Monte Carlo night club. Going there they investigate two men, one named Doc the other named Prima. Doc does not recall seeing the dead man, however Prima does. Witnessing starlet Lynn Froheim being dumped out of a car after being robbed, he chases after the getaway vehicle in a cab.
When he gets out near New York Harbor, the crook known as Knuckles Johnson gets the drop on him and shoots him, causing him to fall into the harbor. Surviving thanks to his bullet proof vest, the Ferret calls in a favor from a stoolie to learn the home address of Knuckles. Arriving there the Ferret falls asleep and soon wakes up to find himself stuck in a blaze set by Knuckles himself. The Ferret manages to break free and escape alive, but learns that Knuckles was since assassinated.
Unsure who could have killed the man, he get Lynn Froheim to disguise herself as a rich woman to try and trick the killer into revealing himself. However, the plan backfires when Lynn's drive is knocked out and Lynn is kidnapped. Finally deducing who the killer is, the Ferret rushes to the Monte Carlo and finding a secret passageway stops Doc before he can eliminate Lynn.
After the police take Doc and his henchmen away, the Ferret reveals to Lynn that he realized it was Doc when he deduced that only a doctor would be able to fatally shoot someone and send them to his door as a message to him, but do so in a way so that the man would die at just the right time to avoid revealing the killers identity.
Appearing in "Adventures of Ka-Zar the Great: Fourth Episode"
Featured Characters:
Supporting Characters:
Villains:
- Paul DeKraft
- Ed Kivlin (First appearance)
- Chaka , the ape
- N'Jaga , the leopard
Other Characters:
- Unnamed natives
Locations:
- Africa
- Belgian Congo
- Belgian Congo
Synopsis for "Adventures of Ka-Zar the Great: Fourth Episode"
Years after he murdered John Rand, Paul de Kraft makes a return expedition to the Congo to collect the riches of a emerald rich river bed near the domain of Ka-Zar. He brings along with him Ed Kivlin, who helped fund money on the expedition. Both men are crooked, and plot to betray each other to reap the benefits. Knowing that their native guides far a supposed "white jungle god" of the Congo area, they do not tell the guides where they are going until it is too late. When the guides revolt, De Kraft uses violence to force them to do his bidding.
Ultimately, they reach the river where they begin harvesting the gems. Both men begin plotting against one another, Kivlin hoping to turn the increasingly frightened natives against De Kraft. The humans presences does not go unnoticed and soon Ka-Zar learns of their arrival from the many animals in the area -- particularly Chaka the ape who is angry that they murdered one of his people. Investigating the situation, the jungle man sends his first warning to those in the camp by firing an arrow at one of the natives, killing him.
When the natives believe it to be their jungle god, De Kraft once more uses violence and threats to force them to do his bidding. Ka-Zar recognizes De Kraft as the "Fat Face" who murdered his father and vows to get revenge. When the other animals in the jungle gather seeking to attack the camp en masse, Ka-Zar with the support of Zar, Sha, and Trajah, convinces them to stay back and let him handle it. N'Jaga is the only one who does not fully trust Ka-Zar as he is also a human.
Ka-Zar nears the camp once more, scaring the natives into fleeing by letting out a lions roar. This sudden display of cowardice angers De Kraft even more. Later when Kivlin heads up river to collect more emeralds for himself, he spots Zar and is about to shoot him when he is confronted by Ka-Zar. The savage warns Kivlin that he and the natives are to leave, sending the man running back to camp in a fright.
This story is continued next issue...
Notes
- The stories of this issue are reprinted in other comics and books, see references for more info.[2]
|
This comic is reprinted in the comic: Marvel Masterworks Vol 1 36 |
See Also
- Write your own review of this comic!
- Discuss Marvel Mystery Comics Vol 1 4 on the forums
- Images from Marvel Mystery Comics Vol 1 4
Footnotes
- ↑ 1.0 1.1 1.2 First and only known appearance to date besides flashbacks
- ↑ The 1st story is reprinted in the following comics/TPB's:
- Golden Age Marvel Comics Omnibus HC #1 - 19th story
- Marvel Mystery Comics 70th Anniversary Special #1 - 2nd story
- The 2nd story is reprinted in the following comics/TPB's:
- Golden Age Marvel Comics Omnibus HC #1 - 20th story
- The 3rd story is reprinted in the following comics/TPB's:
- Golden Age Marvel Comics Omnibus HC #1 - 21st story
- Fantasy Masterpieces #9 - 2nd story
- The 4th story is reprinted in the following comics/TPB's:
- Golden Age Marvel Comics Omnibus HC #1 - 22nd story
- The 6th story is reprinted in the following comics/TPB's:
- Golden Age Marvel Comics Omnibus HC #1 - 23rd story
- The 7th story is reprinted in the following comics/TPB's:
- Golden Age Marvel Comics Omnibus HC #1 - 24th story
- The 8th story is reprinted in the following comics/TPB's:
- Golden Age Marvel Comics Omnibus HC #1 - 25th story
| |||||||||||||||||||||||||||||||||||||||